Monday, January 17, 2011

Project 365 update #3

Here's the last few entries from my project 365 - a photo a day. You can view the entire project by clicking the link at the top of this blog "365- A photo a day"


15 - Time for your meds


This is my mum's 15 year old cat, Bootie (named for her little white boots) who I purchased for $10 with my own money when I was 13.

She survived a health scare late last year and narrowly avoided getting put down because we didn't want her suffering. But against all odds, she managed to somehow get healthy again.

She will live out the rest of her days having to take a tablet each day because of a dodgy thyroid - the cause of her sickness last year.

My parents have gone away for a few days so we went to their house tp feed and medicate the cat today. In this photo, my husband is feeding Bootie her daily tablet wrapped in a piece of turkey breast to disguise the medicine.


16 - Surveillance Overkill


A shot of the tower of CCTV cameras located in the staff carpark of the local council office. I think they're slightly paranoid.

I took this shot while I was riding my bike to work - I'd never noticed it before but I figured they had every angle covered!

This shot is fairly appropriate for our household today with the arrival of my sister-in-law's puppy, Bella, who we will be baby-sitting for a week: she will be under total surveillance by my husband and me!
(No doubt some puppy photos will feature over the coming days!)

Taken from the seat of a bicycle, vignette and green tinge added to make the cameras feel like they are the ones being watched...

f/20, 1/100s, ISO 200

17 - These boots were made for shovelling


This is what my boots looked like after 3.5 hours of shovelling thicky, sloppy mud from the farm yard animal pen at the RSPCA, Fairfield, Qld.

The RSPCA Brisbane headquaters was totally flooded in last week's flood (some buildings right up to their roof) but fortunately all animals were evacuated safely.

I went along today to help them clean up and it was great to see so many other animal lovers lending a hand. Because the RSPCA is a charity, they don't qualify for any of the government's flood relief funding :(

After we'd scraped up as much mud as we could, I sprinkled lime all over the ground to help kill any nasty bugs that may have been in the mud.

A hot, tiring and messy day but well worth the effort!

PS I don't have 'cankles' - the boots/socks come about half way up my shins :)

Taken with my point and shoot camera (Olympus u1030 SW) set to 'portrait' mode which resulted in f/4.5, 1/500s, ISO 80


18 - New best friend

Today was a day of puppy-sitting and hot weather. As previously promised, here's a shot of the pup! (plus my own gentle giant, Nelson. He's the one on the left :)

Bella (the pup) is a 9 week old chocolate Labrador and belongs to my sister-in-law and her family. We're looking after Bella for a week while the family is on holiday.

Nelson is a Labradoodle and is turning 7 this year. Despite his relatively 'old-man' status, he's never really grown up and is almost as much of a puppy as when we first got him.

The two of them just LOVE each other to bits! They constantly play together and Nelson is just so gentle with her it's amazing - she even had her head in his mouth at one stage and he just sat there, lol.

PS the title of this shot was taken from an episode of "Absolutely Fabulous" which is one of my favourite shows.

f/5.3, 1/400, ISO auto which selected an ISO of 2200 (not sure why so high with this value!). Black point and highlights adjusted in photoshop.


Sunday, January 9, 2011

The indoor clothesline


WHAT
This shot was taken in my lounge room and is a close up view of the pegs and washing on the clothes rack we've been forced to set up in an attempt to dry the ever- increasing piles of washing.

This shot was day 8 of my 365 project (see link at the top of this blog for more info)


WHY
The immense ammount of rain we've had lately is still heavily making its impact felt on my life - it's nearly impossible to get any clothes dry!

Originally I had intended to use a photograph of my friends and their baby who were coming over to visit that night as my shot of the day. But when I walked past this now common-place sight in my lounge, the bright multi-coloured pegs were just begging me to photograph them.

I figured it was a fitting shot for my 365 photo as it told some more of the story of my life lately :) ie. a frustrated woman with limited clean underwear remaining!


HOW
I used a large aperture (f/4.5 - as low as my lens would go) in order to get a shallow depth of field. I focused on the yellow peg right of centre. Shot on a tripod in aperture priority mode, with a 1.0s shutter, ISO 250.

POST PRODUCTION
I played with it a bit in photoshop to get the grainy/slightly 'hipstamatic' look :) (increased black point, upped the exposure level, reduced contrast, increased clarity, increased highlights then added a noise filter to get the grainy look.)

Thursday, January 6, 2011

365 Project update

So far so good with the 365 Project! I've only missed one day (January 3rd) and my excuse is that I hadn't decided to do the project until the 4th of Jan and alas, I hadn't taken a photo on the 3rd.

(To see the progress thus far, click the link at the top of the blog page entitled "365 Project-A photo a day")

I've decided that I'm going to try and either make each photo like a little story of what a particular day entailed for me, or what was the most interesting/significant/annoying thing I experienced about that day.

For example on day 7, it rained extremely heavily for about an hour this morning causing flash flooding across the city. But in the afternoon, the sun came out. I was therefore able to take my dog walking for the first time in days. Therefore the photo for January 7 shows my dog, Nelson, on our walk looking at a flooded creek near my house.


I used a shallow depth of field (5/f) to make Nelson the main focus of this image, resulting in the slightly blurred bridge/water. I shot in Aperture priority mode which resulted in the camera selecting a shutter speed of 1/500s. ISO was 200.

Because it was quite dull, the sky unfortunately isn't all that interesting and the brown muddy water is a bit yuck too. But, the whole point of this photo wasn't to take a landscape masterpiece, it was to document my day.

In photoshop, I increased the clarity, black point and upped the luminance/saturation of the red lead/collar to make it stand out and bring a splash of colour.

After publishing today's shot, I've also learnt that I will have to keep in mind the previous photos I've taken in this project - it's only day 7 and already I've included two of Nelson! I don't want one particular person/animal/type of shot to dominate my project. I realise there will be some recurring themes throughout the year but I will try and mix it up.

Tuesday, January 4, 2011

Project 365

To see the most up-to-date version of my Project 365, click the bar at the top of the blog page entiitled "365 Project - A photo a day"

WHAT
Project 365 is my attempt to take 1 photo a day for the whole year. I'm not sure how long I'll stay committed for, but I'm going to give it a go. Having said that, I've already missed one day (the 3rd of January) because I only decided to undertake this project on the 4th of Jan. Luckily, I'd taken some photos on the 1st and 2nd to fill in those days.

WHY
Many people undertake this challenge at the beginning of the year in an effort to use and learn more about their cameras and to train their eye to find a photo in any situation.

Being forced to take a photo each day, I know that some of them will be rubbish if I'm rushed or not really 'feeling' there's a photo to be found somewhere. But this will hopefully help me learn what to do better and encourage me to try out some different photographic techniques or camera settings.

It's also a good way to document my year (for which I have big expectations! :)

HOW
I've set a daily alarm on my phone at 2pm reminding me to take a photo each day. To try and stay motivated, I might also look at setting myself a weekly theme to focus my efforts more if I start to struggle for ideas and to try and photograph things I've never snapped before.

Here are my shots so far (apart from Jan 3rd) - they don't have a set theme yet.

01/01/2011

The above shot is of two of my friends at my New Year's Eve party, taken shortly after midnight (ie. January 1st). I used a shallow depth of field and focused on the bottles in front to blur the happy couple in the background.

02/1/2011

A misty, cloud covering hiking trail at Springbrook National Park, Gold Coast, Australia. My husband and I went hiking on this trail (Twin Falls circuit) as with the recent deluge of rain our state has been experiencing, we were desperate to venture outside while the rain held off!

The cloud actually made it difficult to focus the camera on autofocus mode, as it was getting confused by the swirling mist.

04/01/2011

This is a self portrait in the reflection of a hand dryer in the ladies toilets at my work. It was about 30 mins before taking this photo that I decided to embark on Project 365, hence the rather strange subject matter. This one was taken on my iPhone. I like how shiny the hand dryer is and the random pattern of brown tiles under it. As I said, I was a bit desperate for a photo at this point :)

05/01/2011 My dog, Nelson (a Labradoodle) 'helping' me with the gardening. I thought he looked very cute trying to hide his giant body behind the vines.

I used a large aperture to increase the shutter speed in the available light so that I could quickly fire off a series of shots and get his in focus as he was moving around sniffing things a fair bit.

Thursday, December 30, 2010

Jelly shots for the New Year


WHAT
A shot of the inside of my fridge which, at the moment, is home to dozens of vodka jelly shots in preparation for my New Year's Eve party.
The green ones are lime, the blue are 'berry blue' flavour (they taste a bit like 'Demazin' cold medicine) and the red ones are raspberry flavour. I also have another tray of 'creaming soda' flavoured shots on another shelf.

The recipe for making these shots is at the bottom of this post

WHY
I took this photo mainly to document the jelly shots as part of my NYE party. I've never made jelly shots before and was quite pleased with the results - let's hope the party guests like them too!
I also liked how the light from inside the fridge lit the shots and made some of them appear to glow. Plus, it's not everyday that the inside of the fridge becomes a worthy photographic subject :)

HOW
I hand-held my camera as close to the tray of jelly shots as I could (but still allowing proper focus to be made) so as to avoid other fridge items creeping into the scene as much as possible.

Because it was relatively dark in the fridge and I wanted a fairly shallow depth of field, I opened up the aperture to f/4. This wider aperture allowed more light in to the camera's sensor which meant I could increase the shutter speed (1/13s) to get the hand-held shot without the need for a tripod.

I focused on the centre row of jelly shots (third row from the front).

POST-PRODUCTION
In photoshop, I increased the clarity, black point and vibrance to really make the jelly colours stand out. These alterations also made the rim of the plastic shot glasses brighter and highlighted the white 'reflection' on the tops of the four blue shots at the front.

I also cropped the shot to remove the milk bottle and other assorted fridge items that had snuck in at the sides.

Recipe:
I used 'Aeoroplane' jelly crystals
Place jelly crystals in a bowl.
Pour 1 cup of boiling water over crystals and stir very well to dissolve.
Add 150ml vodka
Add 50ml cold water
Stir again
Pour mixture into shot glasses
Refrigerate for approximately 4 hours.

NB. If you add too much vodka, the shots will not set properly. Also, to remove the shot from the glass, you may need to run a cake tester or teaspoon around the sides of the glass. Alternatively, you can place a small amount of oil inside the shot glass before making the jelly - I haven't tried this but I've read about other people who did this. I didn't know if the oil would affect the taste or not.

Tuesday, December 28, 2010

Some Christmas cheer


WHAT

This shot was taken on Christmas day at my mum's house where my family had Christmas dinner together. It depicts some of the table settings and decorations my mum had laid out.
I took a bunch of photos that day of the family and other objects in the room but I felt this one turned out the best.


WHY
I've mentioned in a previous blog post: http://kylietphotography.blogspot.com/2010/12/race-day.html the importance of capturing the little things that really MAKE a special day what it is- things such as table decorations, food, table settings and the little touches people have added. Hence why I opted to take this photo.

There were other table settings available to use for this shot, but because this one was on a corner it meant I could easily move around the table till I found an angle I was happy with. I also liked how the golden bon bons in the background were arranged at right angles to each other from this position.
As it turned out, I ended up sitting at this very table setting later on for our big meal!

HOW
Because I was indoors and there was very little ambient light coming in from the windows (it was a miserable rainy day outside), I used a tripod for this shot. Using a tripod was another reason I selected this particular place setting to shoot- it meant I could actually fit the tripod in without having to move too much furniture. A tripod also ensured I could keep the ISO down low (200) to avoid a grainy shot.

I shot in manual mode and adjusted the shutter speed until it was at an apprpriate speed as determined by the camera's light metre. This turned out to be 1/5s.

I used a short aperture of f/5 to make the items beyond my main subject blurry to really focus on santa - otherwise I risked losing him amongst all the other stuff on the table. Plus I like the blurry background effect.

POST-PRODUCTION
In photoshop I increased the clarity, adjusted the black levels, and increased the highlights.

Monday, December 27, 2010

Why it's important to continually check camera settings

A few days ago I went to the Springbrook National Park which is a beautiful rainforest filled with wildlife and waterfalls located in the hinterland of the Gold Coast, Queensland, Australia.

As I was taking photo after photo of what I hoped would be great waterfall shots, I happened to glance at the ISO setting and saw that it was set to 1600 – far and above my intended setting of ISO 200! I had no idea for how long it had been set to 1600 or how many of my shots were now going to appear slightly grainy due to the high ISO.

I definitely didn’t deliberately set the camera to ISO 1600. I’m assuming it happened with an accidental press of the ISO button prior to winding one of the dials with the intent of adjusting the shutter speed or aperture. Therefore, while I thought I was changing one thing, I was actually cranking up the ISO. Curses!

Incidents like the one above have reminded me how important it is to check and re-check the camera settings throughout the day/session.


Here’s a list of the things I’ll be checking and re-checking from now on:

•The mode I’m shooting in – is it manual, aperture priority or shutter priority? This of course depends on what is important in each shot – depth of field or capturing motion (frozen vs fluid). I’m often switching between modes during my photography outings depending on the subject I’m shooting so it’s good to always be aware of what the camera is set to each time.

•ISO setting. To prevent a repeat of the above!

•Cleanliness of the lens. At another waterfall photography outing, I was shooting from inside a dark cavern/cave and failed to notice the misty spray accumulating on my lens during some long exposures. This resulted in many of the shots from that day being utterly useless.

•Aperture. As stated above- if I’ve decided that depth of field is important, I have to decide HOW MUCH depth I want. It’s much easier to blur the background (by increasing the size of the aperture) at the time of taking the photo than to do so in post-production. Similarly, if I want all of that lovely landscape shot to be in focus, it pays to check I have selected the correct aperture.

•Exposure level (ie shutter speed). If I’m capturing the motion of a scene such as a waterfall or a bunch of passing cyclists, I have to decide if I want it sharp (fast shutter) or blurry (slow shutter). The available light usually also plays a part in what shutter speed is used.

Wednesday, December 15, 2010

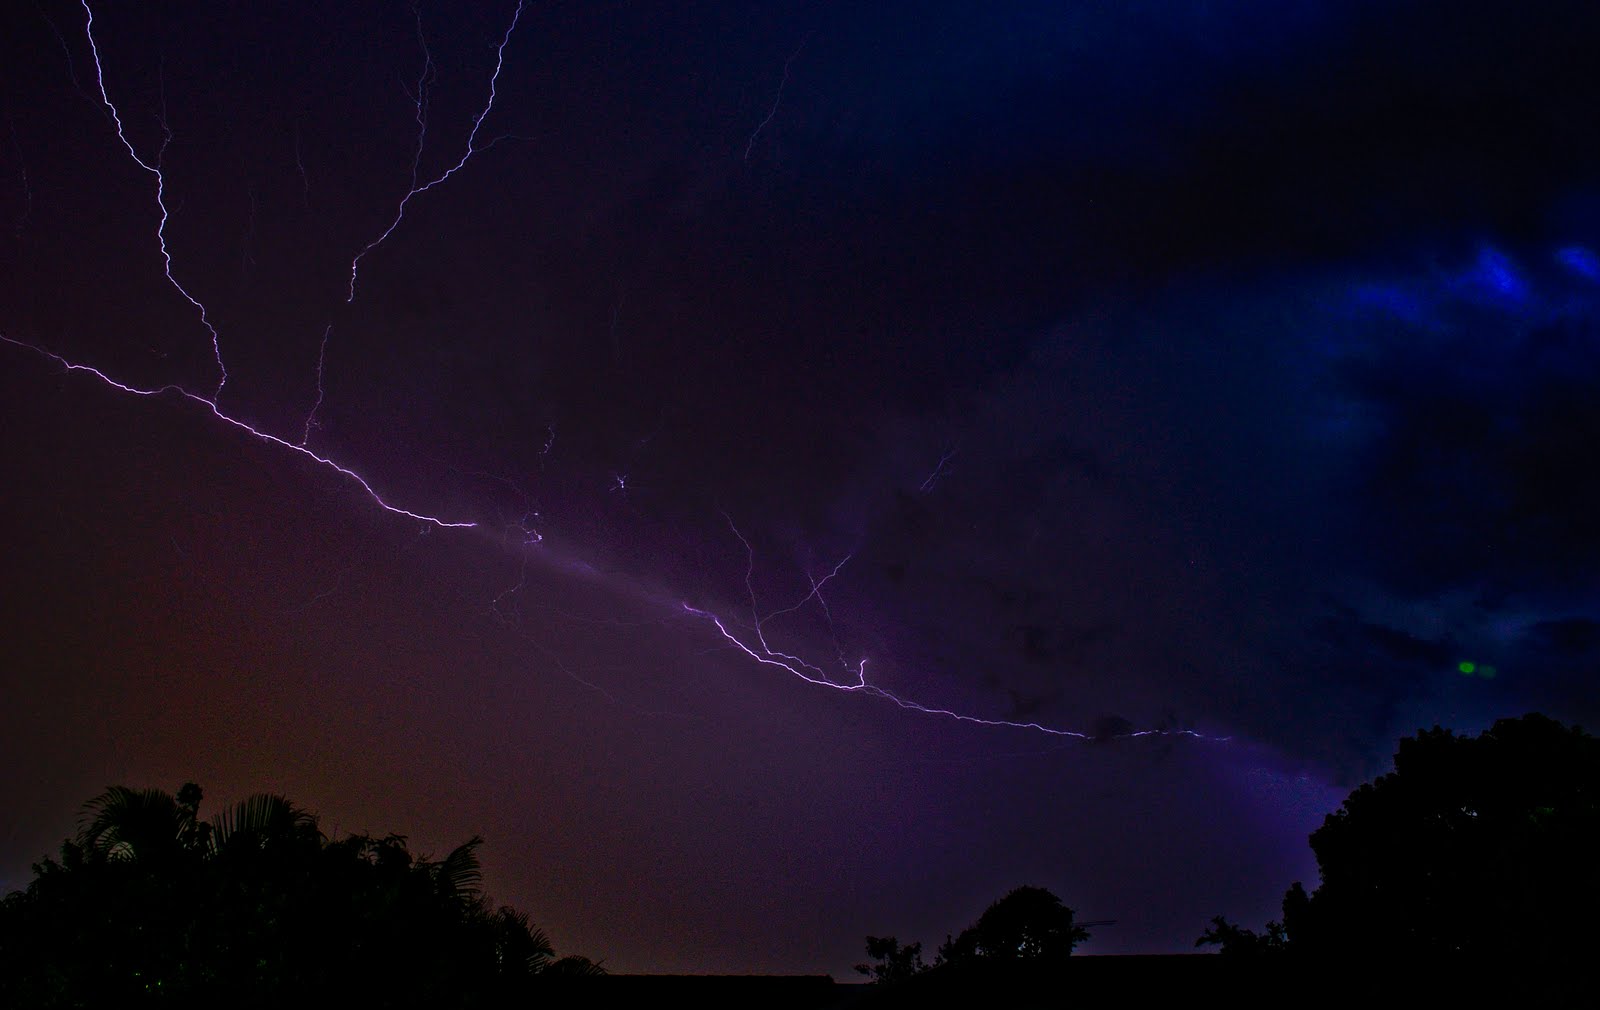
Attempt to capture lightning


WHAT
This is a series of lightning strikes from a recent thunderstorm taken from the safety of my carport. I'm not saying this photograph is spectacular example by any means, but it was my first attempt at capturing lightning with a camera.

WHY
If I had a 'bucket list' describing all the photographs I someday want to take, a lightning strike would definitely be on that list. I had always assumed lightning would be a difficult subject to capture and have always admired photographs of storms and mad weather. Therefore, when I heard the thunder rolling around my house last night, I ducked outside and saw a chance to capture some of the light show.

HOW
I set up my tripod at the edge of my carport with the camera facing the general direction I had seen the lightning coming from. I was careful to ensure that if it started to rain the lens would still have sufficient cover from the roof of the carport.

I then set my camera to 'Manual' mode and spun the dial through all the various shutter speeds until it displayed 'BULB'.

(The bulb setting basically means you have total control over how long the shutter remains open. The longest shutter speed available on my camera is 30 seconds which isn't very long when you're trying to capture the smallest flicker of light in a pitch black sky).

I used an aperture of f/22 and a remote cable release to prevent me having to hold down the shutter release during the entire exposure.

Initially I had the camera pointed directly at the sky where the storm was occurring, however the camera wasn't able to focus on anything because it was so black. I tried switching to manual focus mode to save the camera trying to focus lock onto something that wasn't there but because it was so dark through the viewfinder, I found I wasn't really sure I was going to be focused correctly should any lightning grace me with its presence.

To counter the focus problem, I switched back to auto-focus and then tilted my camera down so that some trees across the road from my house were now in the lower part of the frame, giving the camera a target to focus on.
I then pressed the button and waited for a bunch of lightning to come. This image was a 43 second exposure - don't ask me why 43 seconds, it just seemed long enough as I had seen a few 'episodes' of lightning during that time in the general area my camera was pointing at.

Because this shot was taken in suburbia and there was some ambient street light, I didn't want to overexpose the image by leaving the shutter open for too long. Most of the shots I took that night were exposed for about 1 minute.

POST PRODUCTION
In photoshop, I opened the image as a RAW file and increased the following:
contrast, fill light, clarity and increased the 'lights/highlights' to make the lightning itself stand out more.

Thursday, December 9, 2010

Dog tired


WHAT
This is my dog, Nelson, having a lie down in his kennel. He's a 7 year old labradoodle and the first dog I've ever owned.

WHY
Why else do people take photos of their pets? Because they love them and want to capture their personality and antics. Plus, I'd recently been asked to photograph the pets of some friends and I wasn't 100% happy with the results, so I thought I'd practice.

HOW
Before venturing anywhere near Nelson, I had the camera already set to what I'd anticipated would work for the outside lighting conditions. This was on manual mode, aperture of 8 and a shutter speed of 1/13s (gauged from using the camera's light meter). This ensured that should he decide to suddenly move and ruin the cute pose, at least I'd have a fleeting chance of getting 1 or 2 quick shots in.

This shot was taken from just outside the back door to our house which is where Nelson's kennel is located. I had to move very slowly out the door with the camera in order to capture him lying down like this because usually as soon as I even look like going outside, Nelson comes flying out of his kennel excited and thinking he's going to get walked, fed or patted (or all three).

I focused on his eyes and got down very low so that I was at his level. I also used the side and floor of his kennel to frame the image.
I used aperture f/8 because this usually produces a good focal length and ensures most things are sharp and in focus. I've encounted problems previously using larger apertures (eg. f/6 and below) when photographing friend's pets with long noses - when you focus on the eyes at these larger apertures, the nose and mouth become soft/blurred and can ruin the shot as you're often trying to capture a dog's smiling mouth at the same sharpness as his eyes.

In the image above, Nelson's nose isn't 100% sharp, however I wasn't worried about that in this instance.
Because it was a very dull/rainy day, there wasn't much light available to produce a fast enough shutter speed for my liking. Therefore I increased the ISO to 320.

POST PRODUCTION
The image was firstly converted to greyscale in photoshop. I then made slight adjustments to the contrast, black point and clarity of the image.

Monday, December 6, 2010

Race Day


WHAT
Table decorations, wine glass, sweepstakes ticket and a betting receipt on a table at a Melbourne Cup luncheon. The 'Melbourne Cup' is perhaps Australia's best known horse race and is billed as 'The race that stops the nation.' The race is held annually on the first Tuesday of November and is widely celebrated at racecourses, pubs, clubs, schools and workplaces around the nation.

WHY
I took my camera along to this luncheon intending to get some action shots of the crowd as they watched the race being broadcast on the big screen. However, because we were indoors in a dimly lit location, the photos I'd taken of the people were quite dark, even with the ISO cranked up and shutter speed slowed down.

Therefore in order to remember this day, I tried a different tactic:
I've always liked photographs taken at table height of glasswhere, confetti, cutlery etc so I constructed my own scene to commemorate my Melbourne Cup lunch. In my opinion, when people attend family celebrations such as birthdays, weddings (or a luncheon such as this) they forget to take photos of the details. By that I mean the little things that make the day what it is.

As if to demonstrate my point, I remember hearing my sister-in-law commenting as I was taking this shot "I wouldn't even think to take a photo of that!"

HOW
I selected a few items that, to me, are intrinsically 'Melbourne Cup' - a betting slip, a wine glass, and a sweepstakes ticket. I played around with the positioning of these items until I was happy with the composition of the scene. The miniature 'confetti horses' were a nice touch placed on each table by the establishment hosting the lunch. .

Due to the low lighting, I increased the ISO to 800 in order to provide a bright enough image. In manual mode, I used f/6.3 and shutter speed 1/5s.

POST PRODUCTION
In photoshop, I increased the clarity and vibrance slightly.

Wednesday, December 1, 2010

Sunrise at the beach


WHAT
Sunrise at the public swimming pool at King's Beach, Caloundra. Caloundra is a beautiful sea-side town situated on the Sunshine Coast, Queensland and is about 1 hour north of Brisbane.

WHY
King's Beach has been a favourite holiday destination of my family's for over 20 years. I love going up there at this time of the year (or any time of year for that matter) and was on a recent 'weekend getaway' with my husband. I realised that in all my trips to this beautiful location, I'd never once seen the sun rise there. Of course, I had to make ammends by capturing it with my camera!

Prior to the sun rising on this day, I'd been at the other end of King's Beach attempting to get a nice sea-scape shot of the water flowing over the rocks at low-tide. This proved fairly unsuccessful due to the large amount of cloud around at the time.

After the sun had risen, I wandered up the beach to the location seen in the image above and loved the way the umbrellas were silhouetted in the sunlight. I then spotted the boat on the horizon.

HOW
I positioned myself so that the shade structure on the left would block out the intense, glaring white ball that was the sun and then waited for the boat to sail along until it was between 2 of the umbrellas.

I think I used a tripod for this one as I had intended to make an HDR image using 3 different exposure values and therefore needed the 3 shots to be identical. However, I decided that the HDR version of this shot didn't look very good so I opted for this exposure (the '0' EV) instead.

I used the aperture priority setting, set to f/16 with a shutter speed of 1/160s.

POST PRODUCTION
I used photoshop to shift the tint of this shot slightly towards the purple end of the spectrum to give the sky a nice colour.

Tuesday, November 30, 2010

Colourful City Abstract

WHAT
This is a detailed look at the side of the colourful 'Santos' building on Tank Street, Brisbane City. The grey/blue squares are the windows and the pink/red/orange colours mark each floor of the building.


WHY
On this particular day, I'd been searching for some 'abstract' style shots around Brisbane City. This building caught my eye because of the contrasting bright colours. I thought it was a perfect candidate image to add to one of the groups of which I'm a member on 'Redbubble' called "Abstract Lines".

It wasn't until I took at look at this shot on my computer that I realised I'd managed to capture 2 office ceiling lights on the right hand side of my image, which I quite liked.

HOW
For this shot, I was standing on the footpath a block over from the Santos building and at about a 45 degree angle to the side of the Santos building. I used a tripod and attached my 70-300m lens so I could sufficiently zoom in to the colourful features of the building and exclude the sky or any other nearby structures. I set the camera to manual mode and zoomed to 180mm.

Taken at aperture f/10 and 1/200s shutter speed

POST PRODUCTION
I used photoshop to slightly increase the vibrance of the building's colours


Buy my art

Sunday, November 28, 2010

Time out before the rains

WHAT:
This is the pier at Shorncliffe, north of Brisbane City. Taken at about 3:30pm before a heavy downpouring of rain.

WHY
The Shorncliffe pier is a favourite hang-out of mine for both relaxing and for photography. It's always crawling with fishermen, walkers, joggers, cyclists and people like me.

This shot was one of my last for the day before I went home - I only took it on a whim and I'm glad I listened to my instincts as it was about the only one worth printing from the outing! I loved how the fading light was hitting parts of the white railings.

HOW
I hand-held my camera at eye-level to take 3 images at exposure values of (-2,0,+2). I stood in the centre of the pier. The man on the left was just walking into my frame and I swung the camera slightly to the left to include him in the image.

Captured using aperture priority, f8, shutter speed 1/640, ISO 200.

POST PRODUCTION
I used Photomatix to combine and tonemap the three images taken at the pier. Because the man on the left was walking as I took my three shots, he initially had a pretty awful 'ghosting' effect. I decided to re-create my HDR image and selected the 'attempt to reduce ghosting artifacts' option. This resulted in the man being nicely frozen in time without any noticeable ghosting effect.

After I'd played around with the various levels in Photomatix, I then opened the image in photoshop. I then increased the vibrance, contrast and clarity levels to really bring out the clouds and subtle differences in the grain of the wood in the pier.

Buy my art

Thursday, November 25, 2010

Natural Arch


WHAT
This is a well-known tourist and photographer's haunt known as "Natural Bridge" or "Natural Arch." It's located in the Springbook National Park (about 90 mins from Brisbane).

The arch/bridge is actually a hole in the roof of a cave. That hole resulted from many, many years of a waterfall far above wearing away the soft rock of the cave's roof.

I took this photo from the concrete walkway which leads into the actual cave.

WHY
Most of the 'classic' images that I have seen taken at this location are shot from inside the cave and are very beutiful. I wanted to get me one of those photos for myself and had never been there before.

Apart from being a beautiful location, the Natural Arch is a very challenging subject to capture: the darkness of the cave interior combined with the bright light coming through the hole in the roof and from outside make it a interesting task for judging exposure times.

I was hoping that I'd get a great shot from inside the cave. However when I got home and looked at my pictures, I realised most of my shots from inside the cave had been taken with a light mist from the waterfall covering my lens.... Curses!!!

With regards to the image posted above, I liked the way the rocks nicely framed the water pouring through the hole in the roof off the cave, almost like you're peering through a window into another world. I happened to glance towards the waterfall on my way into the cave when I spotted this specific location and subsequently had to stop. Lucky I did stop cos it produced the only salvageable image of the day!

HOW
I used a tripod and set the camera to aperture priority and took 3 exposures taken at -2,0,+2. This resulted in the shutter speeds being 1/13, 0.3 and 1.3 seconds respectively. The aperture was set to f4.8.

POST PRODUCTION
The 3 exposures were tonemapped together in Photomatix to produce an HDR image. I made adjustments using the sliders in photomatix until I got a result I was satisfied with.


Buy my art

Monday, November 22, 2010

Abandoned train tunnel


WHAT
This location is an old abandoned train tunnel at the town of Mooloolah (about 1 hr north of Brisbane City). The tunnel was part of the original railway linking Brisbane and Gympie but fell into disuse in 1931. It's now part of the Dularcha National Park.

The tunnel is constructed of concrete and is quite spooky - it's dark, damp, has a resident bat colony and a massive echo effect.

WHY

I'd been to this tunnel a few weeks prior to taking this shot but failed to take multiple exposure shots on that first visit. This time, I returned with a friend (as I said, it's very spooky!) and took multiple exposure shots at -2,0+2 for HDR processing.

Prior to getting this particular shot, I had been taking photos a little way inside the entrance to the tunnel looking straight ahead to the opposite end. When I reviewed them, I discovered they just weren't all that interesting - yes, there was an old tunnel and yes, there was a light at the end of it...but that was about all.

I looked around for further inspiration and saw the arch-way (seen on the left of the image) further down the tunnel. So I picked up my tripod and marched myself further into the darkness and positioned the camera off to the right hand side and pointed it at the arch-way.

This new position resulted in light from the entrance behind me being cast onto one side of the arch-way, breaking up the monotony of the dark tunnel walls. Overall, a more interesting photo I thought.

HOW
Once in position, I set the camera to take 3 bracketed shots at -2,0,+2 exposures whilst in aperture priorty mode. I used a remote cable shutter and a tripod to ensure the camera was completely still.

POST PRODUCTION
Once home (and no longer in fear of being bitten by a bat on the back of my neck), I imported and tonemapped the three shots using photomatix to produce an HDR image. In photoshop, I then made slight adjustments to the contrast to really bring out the differences in the light/shadow areas.

Saturday, November 20, 2010

Graffiti man

WHAT
This piece of street art was located on one of the walls of the Fortitude Valley Firestation, Brisbane City. I'm not sure, but it looks like something done by the notorious street artist, Banksy.

WHY
I liked the idea that the 'simpleton' holding the camera up to his face (most likely to photograph the nearby landmark Storey Bridge) is likely to get smacked in the face if the fire door suddenly opens.

This piece of artwork amused me because it reminded me of myself when I'm taking photos - a bit of a 'simpleton' and oblivious to what's going on around me :)

HOW
I used a tripod as this image was taken at about 8pm. I used an aperture setting of 8 and a shutter speed of about 2.5 seconds. ISO setting was 200.

POST PRODUCTION
This HDR image was created using a single shot which was then converted into 3 exposures of -2,0,+2 using photoshop. At the time of taking the photo, I'd been taking three shots at the previously mentioned exposures, however when I tonemapped the 3 images in photomatix I wasn't happy with the results, hence why I ended up using a single original image to create three exposures.

After creating the HDR image (which was originally in colour) I used photoshop to produce the black and white version and increased contrast and clarity.


Buy my art

Tuesday, November 16, 2010

The tree at Brighton


WHAT
This tree is located at the southern end of the Hornibrook bridge, Brighton. (About 40mins north of Brisbane). I took this photo at low tide and about 45 mins before sunset.

WHY
My husband took a beautiful photograph of this same tree about 4 years ago and I have always loved the image of the lone tree with the rocks in front of it. At the time, I'd just started getting into HDR and I wanted to try it out on this tree.

HOW
I set up my tripod in the soft sand directly in front of the tree at eyelevel. There were a few other mangrove type plants very close to my location, so I was careful to exclude them from my frame. I set the camera to 'bracket' and took three shots - one at each of the following exposures: -2, 0, +2.

If I had my time over with this shot, I probably would have moved the tripod and myself closer to the tree so that it fills the frame more.


POST PRODUCTION
Once home (and after cleaning the legs of my tripod!), I uploaded the images into Photomatix and tonemapped them to this result.

I like the colours of the sunset reflected in the water and the way the tree itself seems to glow.

Buy art

What I've learnt so far

In the very first entry of this blog, I mentioned an article on digitalphotographyschool.com where the author posted a list of 100 things he had learnt about photography.

Although I've not been at this photography thing long, here's a list of what I've learnt so far (some of which are on the original 100 things list mentioned):

1. Ask for help – people who also like photography are usually only
too willing to talk to you and provide suggestions/tips to
improve your photography

2. Photography can forge friendships where previously not thought
possible

3. Many people think they have a good ‘photographer’s eye’ and will
suggest things they think you should take photos of

4. Clouds are 3D – sounds obvious, but when you start paying
attention to their colour, shape, height, and the impact they
can have on your photos you start to see them differently

5. Trawl the internet for photography tips, forums, and ‘how to’
tutorials- there’s an enormous wealth of knowledge to draw from
out there

6. Check the front of your lens for smudges before a shoot – it’s
heartbreaking to find a great big fingerprint or splash mark
from a waterfall in the centre of all your pictures afterwards….

7. If something catches your eye, there’s a reason for it – so take
a photo of it

8. Photos taken at eyelevel can be much more interesting if taken
from a lower height.

9. Things may appear sharp and in focus at the time of shooting,
but once viewed on a larger screen back home…they’re not.

10. Be prepared for all types of weather

11. Don’t wear your best clothes out on a photo shoot – you may get
dirty kneeling/leaning on different surfaces. Comfortable
shoes are a must also for extended shoots where you need to
hike to your chosen location

12. Take a jumper even if you don’t think you need it

13. Whilst photographing friends/family, take candid shots when
they’re in conversation or not directly looking at the camera –
it makes for more interesting photos

14. When you take a photo in a public place, nearly every passer-by
will try to work out what it is you’re photographing

15. Photoshop is not cheating – it’s about producing the best
possible image with what you’ve got

16. When you’re trying to get passers-by in your shot, they will
avoid walking in front of your lens.

17. When you’re trying to avoid passers-by getting in your shot,
they will walk in front of your lens.

18. If you set up a tripod, they will come. People assume that
because you have a tripod, you must know what you're doing and
therefore they want to take the same photo as you.

Monday, November 15, 2010

UQ Cloisters


WHAT
Cloisters of the 'Earth Sciences' building at St Lucia campus of the University of Queensland (UQ).

WHY
UQ was where I studied my science degree and I always liked the sandstone buildings that surrounded the grassy "Great Court" Area.

I selected this particular cloister to photograph because of the nice shadows cast by the arches and columns on the left wall . Looking into the photo, I find my eye is drawn to the end of the pathway and makes me want to see what's around the corner.

HOW
At the time I took this shot, I had just been introduced to the world of HDR (High Dynamic Range) photography by my husband. Therefore, this in an HDR image. I used a tripod and remote cable shutter lead to prevent any movement of the camera for the 3 bracketed shots I took. The exposure levels for the three shots were -2,0,+2.

Usually the campus is bustling with students moving around, however I was there on a weekend about an hour before sunset and the place was almost deserted, hence I was able to take my time composing the shot without people walking through it.

POST PRODUCTION
I uploaded the 3 images into Photomatix (software used for producing HDR images by combining shots taken at different exposure levels). I then tone mapped and adjusted the resulting image using the available options in photomatix until I was happy with the results.


Buy my art

Number 48


WHAT
A close up shot of a house number screwed onto a brick wall at Redcliffe, Queensland.

WHY
This little ceramic number caught my eye for a number of reasons:
it was the only other colour on the orange brick wall and the bright blue made a nice contrast with the brick. The texture in the cracking/peeling paint also intrigued me.

I have read a number of photographer Ken Rockwells blog posts and he often talks about seeking out splashes of colour to photograph. I think his words had crept into my mind as I was walking past number 48 and saw this plaque. For some reason I just like it!

HOW
I think I may have actually used the macro setting on my camera to capture this one. I literally stood in front of it and pointed the camera at number 48, filling the entire frame with the plaque.

POST PRODUCTION
Increased clarity and vibrance in photoshop


Buy my art